from Instagram: http://ift.tt/1ATbjf4
Glocal & Possimpible

If you try to install the latest (as of today) Plex package for Synology on the brand new DS1815+) it will fail and tell you that you that this hardware architecture was not supported. That is not true, because the DS1813+ uses the same processor architecture as its predecessor. However Synology uses a different codenames to refer to the newer models. But for external software like Plex they still look the same. So all you need to do is to add the new codename (“avoton”) to the configuration file of the Plex package.
Here is a short walk through:
Works like a charm. If not you need to allow 3rd party software on the Synology or your archiving program changed the package too much, when it created the new package. Try a different archiver or unpack the whole thing, change the “INFO” file, create a new tar archive and rename the extension to “.spk”.
If you are too lazy to do it yourself, you can download my changed package here.
Disclaimer: I saw in older posts in the Plex Forum, that they do not mind if someone redistributes slightly changed packages to help others, as long as a) it is clear that the software belongs to Plex and not me, b) you still obey all their legal terms and b) you are aware that this totally unsupported by Plex, myself or anyone else in his right mind. I just do this as a favor for all of you who are as lazy as I am. But I am happy to delete the file faster than a lawyer can spell “Cease and desist letter” if Plex is not OK with the download. If you install this, you are doing it on your own risk. I am not a developer and I might have made all sorts of mistakes. It might kill your canary bird, give your grandmother diarrhea for weeks and turn your Disk Station into a well designed spice shelf. It works flawless on my Disk Station, so you will probably be safe, but I also can’t guarantee that these awful things will NOT happen to you.
If you use a bluetooth headset and did update your Apple Computer to Yosemite, you probably also discovered that the sound starts to lag after a few minutes or when the computer just woke up from hibernation mode. With OSX 10.10.1 being the latest version, there is still no real fix available. The only option right now is to install the latest beta version of 10.10.2. I did that a few day ago, the bluetooth issue is fixed and I also did not experience any other problems.
All you need to do is switch the App Store to the beta channel by copying the following instructions into terminal and enter your admin password:
sudo /usr/sbin/softwareupdate --set-catalog https://swscan.apple.com/content/catalogs/others/index-10.10seed-10.10-10.9-mountainlion-lion-snowleopard-leopard.merged-1.sucatalog.gz
Afterwards start or restart the App Store and search for updates. It should give you the option to install 10.10.2 (Beta 3 / Build 14C81f) just like any other OSX update. It takes about 5 minutes to download and 10 minutes to restart and install. The bluetooth audio lag should be gone.
Update: My version numbers where .1 too high, so I changed that back to the real numbers.
I have a Synology DiskStation DS1815+ since a few weeks now and I already got annoyed with Chrome Browser warning me about the self signed SSL certificate. So I installed a free AND valid certificate from StartSSL to get rid of the warning. Here are the steps you need to take (yes, it is a very short howto):
After logging out, closing the browser window or tab and logging back in, you should see no more SSL warnings.

(via @puppetmasterd)
“There is always some madness in love. But there is also always some reason in madness.”
I am spending more and more time in the US and so I decided to set up a bank account with an American bank. Of course you can use most of the German Debit and Credit Cards here, but it is much more expensive. The German banks usually charge extra for payments made in US Dollar and ATM withdrawals in foreign countries. It is also more convinient to have a US Debit and Credit Card. You can pay gas directly at the pump and some online services do not accept foreign cards.
While the process of setting up the bank account was pretty easy (for me, not for the bank rep who was constantly looking up stuff in his guideline books) the banking fees here are insane compared to the ones in Germany. Just to give you a few examples: For an incoming domestic wire transfer (“eingehende Überweisung”) they charge $15, for a international one $30. If you overdraft your account, there is a $34 fee for each transaction, while the account balance is negative, in addition to the interest rates, which can be up to 19,99% (The sales rep had to lough himself as he was explaining them to me and I asked if that was a joke.)
But my main use cases being, getting cash from the ATM and using the Debit/Credit Card are free, so it still would be cheaper and easier than using my German cards.
However transferring money from Germany to a US bank account is a very different story. I did a first transfer of 1000 Euro and when it showed up in the US account, around $86 where missing. I wrote to ComDirect and Chase for an statement showing me the exchange rate used and the fees subtracted, but both said it was outside their responsibility because they had used Bank Of America as an agent and they had no idea what the fees were. So almost 7% of the money were missing and I could not even get a receipt for the fees.
In my opinion, that is a very smart form of embezzlement, so I needed another solution and found TransferWise. A online service especially made to transfer money internationally at low and transparent fees. They use the official mid-market or interbank rate to exchange the currencies and charge only a low fee of 0,5%. So I did another test transfer of 1000 EUR with them. It took a few days longer than the regular wire transfer, but it was much cheaper. Not only did they really only charge 5 EUR in fees, they also used ACH, which made it free to receive at Chase.
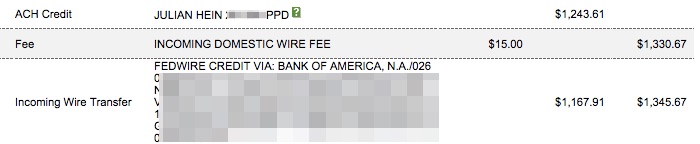
So by using their service, I saved $80 or 64 EUR in fees for the transaction. That is a pretty big difference. TransferWise was created by the people who initially founded Skype and is backed by investments of Richard Branson, Index Ventures and many others. They achieve the cheaper price difference by not really moving the money but trying to match your transfer with other transfers going into the opposite direction.
(Disclaimer: The link I used is an affiliate link. It will give you one free money transfer and me 70 GBP should 3 people sign up and transfer money at least once. Which will probably never happen. So I get nothing and the one person who will try it a free transfer.)